

Blog
Motorola APX Accessory Connector Pinout: Role In Radio System
I have seen installers spend three hours diagnosing audio failure that traced back to two reversed pins on the APX accessory connector. The radio powered up, the accessory initialized, and everything looked fine until audio came through sounding hollow and weak. This guide breaks down the Motorola APX accessory connector pinout, with a focused look at the APX 6500, so you understand what each pin does, how to read the wiring diagram correctly, and what to check before you ever apply power.

Key Takeaways
- The APX 6500 uses a 16-pin accessory connector carrying audio, power, and data signals through separate dedicated pins.
- Pin assignments differ between APX models — always use APX 6500-specific documentation, not a generic APX guide.
- Alternator whine that rises with engine RPM points to a grounding fault, not an impedance or speaker problem.
- A failed data handshake produces no error message — the accessory simply goes unrecognized at startup.
- Test continuity on every pin before applying power to avoid faults that take hours to trace.
Table of Contents
Motorola APX Accessory Connector Pinout
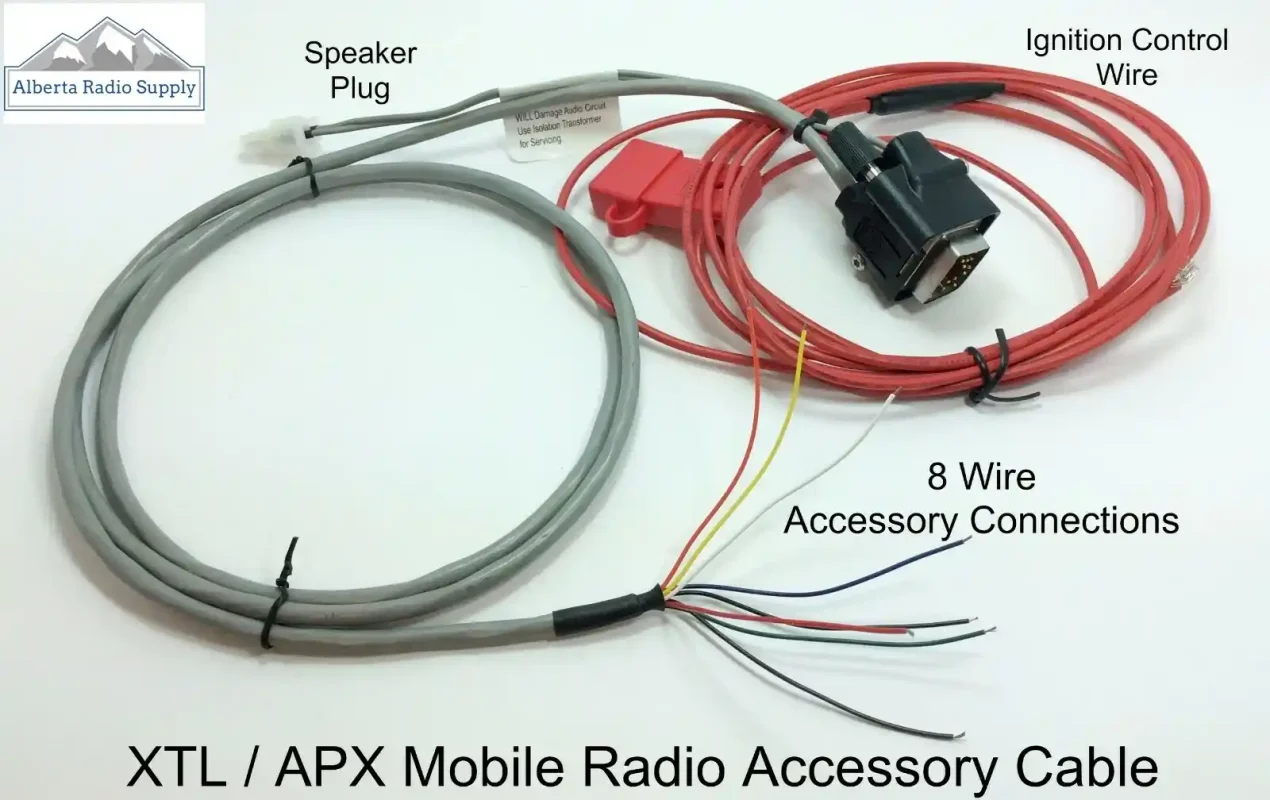
The Motorola APX accessory connector pinout is the complete electrical map of every contact point on the radio’s external accessory interface. Each pin carries a fixed assignment — audio input, audio output, power delivery, data communication, or ground return — and those assignments are specific to each APX model.
On the APX 6500, the connector is a 16-pin rectangular interface arranged in two rows on the rear panel of the radio head. Pin numbering runs from a defined starting position shown on the mating face of the connector in Motorola’s installation diagrams. That orientation detail matters more than most installers expect: a diagram viewed from the cable side is a mirror image of the mating face view, and reversing that orientation shifts the entire pin layout.
APX 6500 Accessory Connector Pin Category Overview
| Pin Category | Signal Direction | Function Summary |
|---|---|---|
| Audio Output | Radio to accessory | External speaker, amplified output |
| Audio Input | Accessory to radio | Microphone, line-level input |
| Accessory Power | Radio to accessory | Regulated DC supply for accessories |
| Switched Power | Radio to accessory | Power active only when radio is on |
| Data Bus | Bidirectional | Programming, accessory ID, encryption |
| Ground Return | Accessory to radio | Common reference for all signals |
Here is the thing: the assumption that all APX models share the same pinout is where most wiring errors start. The APX 6500 is built for vehicle environments with higher current capacity and a full data bus that portable APX models do not carry. Before touching a wire, have the APX 6500 Mobile Radio Installation Guide open in front of you.
Need professional wiring assistance for your APX radio accessories? Contact our certified technicians today for fast, reliable installation support tailored to your communication needs.
What Is The APX Accessory Connector And How Does It Work?
The APX accessory connector is the single point where the radio interfaces with everything external to it. Audio exits toward external speakers. Microphone audio enters through dedicated input pins. Power flows outward to accessories that require it. Data moves bidirectionally as the radio and accessory negotiate identification at startup.
Common accessories that connect through this port include remote control heads, external speakers, noise-canceling microphones, CPS programming cables, and encryption accessories that require authentication before they operate.
The three signal categories — audio, power, and data — occupy separate pins with no shared functions. That separation is useful for fault diagnosis. If audio fails but the accessory is still recognized by the radio, the fault is in the audio pins. If the accessory is not recognized at all, the data pins are where you look first.
So what does this look like in practice? A microphone connected to the correct audio input pin but with the ground return pin disconnected will produce audio with a loud background hum. The accessory appears connected, but the reference point for the audio signal is missing. That symptom pattern points directly to the ground return pin without requiring any other diagnosis.
What Is The Pinout Difference Between The APX 6500 And Other APX Models?
Not all APX radios use the same accessory connector layout, and the differences are not minor.
| Feature | APX 6500 Mobile | APX 6000 Portable | APX 8000 Portable |
|---|---|---|---|
| Connector Format | 16-pin rear accessory | Multi-pin side port | Multi-pin side port |
| Power Output Capacity | Higher current rated | Limited | Limited |
| Control Head Interface Pins | Present | Not applicable | Not applicable |
| Full Data Bus Support | Yes | Reduced | Reduced |
Accessories designed for portable APX radios are not plug-compatible with the APX 6500. Physical connector formats differ. Where third-party adapters exist, they mate the connectors physically but do not remap signal assignments. An audio output pin in the APX 6500 pinout may correspond to a data pin position in a portable APX adapter — and that mismatch can damage both devices.
Always begin with the APX 6500 Mobile Radio Installation Guide specifically. Using documentation from any other APX model, even a closely related one, introduces pin assignment risk.
Is Your APX Audio Failing Mid-Install?
Many APX 6500 installation issues come from reversed pins or grounding faults that silently degrade audio quality. Discover how to quickly identify the real cause before hours are wasted on misdiagnosis.
How To Read The Motorola APX 6500 Wiring Diagram Correctly
Motorola wiring diagrams use a standardized notation system. Each pin appears as a numbered terminal connected to a function label using Motorola’s internal signal naming conventions. “EXT SPK+” identifies the external speaker positive output. “MIC AUDIO” identifies the microphone input. “ACCESSORY PWR” marks the regulated power output pin.
Reading the diagram correctly follows three steps in sequence:
- Locate the pin number on the diagram
- Read the function label assigned to that pin number
- Confirm the physical location of that numbered pin on the actual connector using the mating face orientation
Worked Example: Pin 3 on the APX 6500 diagram carries the external speaker positive signal, labeled “EXT SPK+.” On the physical connector, viewed from the mating face, Pin 3 sits in the upper row, third position from the left. The wire going to the positive terminal of your external speaker connects here. Before making that connection, verify continuity from the wire source to Pin 3, confirm Pin 3 is not shorted to Pin 4 (the speaker negative), then make the connection.
Motorola diagrams are oriented from the mating face — the face the accessory plug approaches. Viewing from the opposite side reverses the entire left-right layout.
What Are The Most Common APX 6500 Accessory Connector Wiring Mistakes?
Reversed audio polarity on the speaker output pins is the most frequent error. Audio still plays, but it sounds thin and lacks low frequencies due to phase cancellation. That symptom is commonly misdiagnosed as a speaker impedance problem or an audio level setting, which wastes diagnostic time.
The second most damaging mistake is exceeding the current rating of the accessory power pins by connecting multiple accessories without calculating their combined draw. This does not always produce an immediate failure. It causes intermittent resets and thermal stress that shortens connector service life over months.
Pre-Power Installation Checklist:
- Verify pin orientation against the APX 6500 diagram with the connector labeled in front of you, not from memory
- Run continuity from each wire source to its target pin
- Check that adjacent pins are not shorted to each other
- Add up the current draw of every accessory on the power pins and compare to the rated output in the installation guide
- Confirm audio pin polarity matches the diagram before connecting any speaker
How Does The APX Accessory Connector Support External Audio Devices?
External audio routing uses dedicated speaker output and microphone input pins that operate independently from the radio’s internal speaker. Both paths can be active simultaneously, and the radio’s configuration settings determine how audio is distributed between them.
Impedance matching between the external speaker and the connector’s audio output pin is a technical requirement. Connecting a speaker with significantly lower impedance than the rated output increases current draw beyond safe limits. Connecting a speaker with significantly higher impedance results in audio that is too quiet to be useful in a vehicle environment.
What Types Of Motorola Connectors Are Used Across The APX Radio Series?
Branching Quiz: Which APX Connector Type Do You Have?
Work through these questions before reading further. Your answers will confirm which connector information applies to your installation.
Question 1: Is your radio mounted in a vehicle or used as a handheld portable?
- Vehicle-mounted: Go to Question 2
- Handheld portable: Your radio uses a multi-pin side port connector. See the portable APX section of the Motorola documentation for your model.
Question 2: Does your radio have a separate control head connected by a cable to the main radio body?
- Yes: You are likely working with an APX 6500 or APX 7500. Go to Question 3.
- No: Confirm your model number against Motorola’s product documentation.
Question 3: Does the connector on the rear of the radio body have two rows of pins?
- Yes: You are working with the 16-pin APX 6500 rear accessory connector. Continue with this guide.
- No: Your connector format may differ. Confirm against the APX 7500 installation documentation.
APX Series Connector Comparison
| APX Model | Connector Format | Primary Use |
|---|---|---|
| APX 6500 | 16-pin rear accessory | Mobile, vehicle-mounted |
| APX 7500 | Multi-pin accessory | Mobile, high-security |
| APX 6000 | Multi-pin side port | Portable, standard |
| APX 8000 | Multi-pin side port | Portable, ruggedized |
Selling Point: Shop our full range of Motorola APX-compatible connectors and accessories — all tested for compatibility and ready to ship directly to your location.
How Does Pin Configuration Affect APX Accessory Compatibility?
Third-Party Accessory Compatibility Verification Checklist:
Before purchasing any third-party APX accessory, confirm answers to these questions:
- Does the product listing name your exact APX model number (not just the APX family)?
- Does the manufacturer provide a connector variant compatibility chart?
- Is the connector format (16-pin rear, multi-pin side) explicitly matched to your radio?
- Has the accessory been tested against Motorola’s accessory data protocol for your connector version?
- If a data connection is involved, does the manufacturer confirm protocol compatibility?
If any answer is no or unknown, treat the accessory as unverified for your installation. A three-pin difference between APX connector variants can cause a power pin in one model to map to a data pin in another, which can damage both the radio and the accessory.
What Are The Power Supply Pins On The APX Accessory Connector?
The APX accessory connector includes dedicated pins that supply regulated voltage to connected accessories. In a vehicle installation, this power originates from the radio’s main power harness, which connects to the vehicle battery. The connector acts as the downstream distribution point.
| Pin Category | Function | Key Installer Consideration |
|---|---|---|
| Accessory Power Output | Regulated voltage to accessory | Total current draw must not exceed rated limit |
| Switched Power | Active only when radio is on | Do not use for always-on accessories |
| Ground Return | Return path for power circuit | Must connect to chassis ground at clean metal surface |
[HUMAN REVIEW NEEDED: Insert confirmed voltage levels and current limits for the APX 6500 accessory power output pins from the Motorola APX 6500 Mobile Radio Installation Guide before publishing. Do not estimate these values.]
When multiple accessories share the power pins, calculate combined current draw before installation. Individual accessories may each fall within limits while their combined draw exceeds the connector’s rated output. Use inline fusing on each accessory power connection. Keep wire runs short. Never daisy-chain accessories off a single power pin without confirming the total current budget against the installation guide specification.
How Is The APX Accessory Connector Used In Vehicle-Mounted Radio Installations?
In a vehicle installation, the APX accessory connector is the central wiring hub for every component the driver interacts with. Control heads, external speakers, and accessory power all route through this connector.
Cable Type Recommendations by Signal Category
| Signal Category | Recommended Cable Type | Key Requirement |
|---|---|---|
| Audio | Shielded twisted pair | Shield grounded at one end only |
| Power | Stranded copper, rated for current draw | Inline fuse on each run |
| Data | Manufacturer-supplied or specified cable | Verify protocol compatibility |
Route audio cables away from ignition wiring, battery cables, and power inverter leads. Vibration abrasion is a long-term failure risk in vehicle installations — secure cables with grommets wherever they pass through metal panels.
What Grounding Practices Are Essential When Wiring The APX Accessory Connector?
Grounding Fault Diagnostic Table
| Symptom | Audio Characteristic | RPM Behavior | Probable Fault |
|---|---|---|---|
| Alternator whine | High-pitched whine | Increases with engine RPM | Grounding fault in power circuit |
| Static hum | Constant low hum | Does not change with RPM | Impedance mismatch or ground loop |
| Intermittent crackling | Random, irregular | Not RPM-related | Loose ground connection at connector |
| Buzzing on transmit only | Present during keying | Not RPM-related | RF feedback into audio ground path |
Ground pins in the APX accessory connector pinout are the reference point for every signal on the connector. They must connect to the same ground plane as the radio’s chassis ground — in a vehicle, that means a direct connection to unpainted metal on the vehicle chassis.
For portable APX installations, the grounding path is simpler but still requires a direct, low-impedance connection back to the radio’s common ground. Routing ground through multiple junction points adds resistance and creates the same susceptibility as a poor vehicle ground.
How To Safely Test An APX Accessory Connector Wiring Connection
Testing before deployment is standard practice, and the sequence matters.
Step 1: With the radio unpowered, use a digital multimeter in continuity mode. Test from each wire source to its target pin at the connector. Every wire must show continuity.
Step 2: Check resistance between each adjacent pin pair. Any indication of a short between neighboring pins must be investigated before power is applied.
Step 3: Apply power and measure voltage at the accessory power output pins with the radio active. Compare the reading to the expected voltage in the APX 6500 installation guide.
Step 4: With a known-good audio source connected, verify signal presence at the speaker output pins before connecting the final speaker accessory.
Tools required: digital multimeter with continuity mode, the official APX 6500 pin diagram accessible during testing, and a signal source for audio verification.
What Do The Data Pins On The Motorola APX Accessory Connector Do?
Data Pins And Their Role In Accessory Communication
Data Pin Failure Scenario Table
| Accessory Type | Successful Handshake Sign | Failed Handshake Sign | First Check |
|---|---|---|---|
| CPS Programming Cable | CPS software detects radio immediately | Software shows no device found | Data pin continuity |
| Encryption Accessory | Accessory authenticates, radio operates normally | Accessory connected but won’t activate | Protocol compatibility |
| Remote Control Head | Display initializes, keys respond | Blank display or unresponsive keys | Data and power pins |
| External Microphone | Audio passes, PTT functions | No audio or PTT response | Audio and data pins |
Data pins carry bidirectional digital communication for accessory identification, encryption key management, and programming data transfer. A failed handshake produces no visible error message. The accessory simply is not recognized at startup, which is itself the diagnostic signal.
Data protocols used through these pins are proprietary to Motorola’s accessory ecosystem. Third-party accessories that cannot fully replicate those protocols will be silently rejected at startup.
How To Identify A Damaged Or Faulty APX Accessory Connector
Start with visual inspection. Look for any pin that is pushed back into the connector body, bent at an angle, or showing surface corrosion. A single displaced pin can interrupt one signal category while all others continue to function normally.
When To Call A Certified Technician — Decision Guide
| Situation | DIY Appropriate | Requires Certified Technician |
|---|---|---|
| Single bent pin, no fracture at base | Careful straightening may be attempted | If pin fractures during straightening |
| Surface corrosion on pin contact | Gentle cleaning with correct contact cleaner | If corrosion is below surface or inside connector body |
| Intermittent audio without visible damage | Continuity testing and pin inspection | If testing shows no fault but problem persists |
| Accessory not recognized after correct wiring | Data pin continuity check | If all checks pass and fault continues |
| Physical connector body damage | Not appropriate | Always requires certified service center |
Performance signs that suggest a faulty connector include audio that cuts in and out under vehicle vibration, accessories that fail to initialize at startup despite correct wiring, and programming failures where CPS drops the connection mid-session.
What Resources Does Motorola Provide For APX Accessory Connector Wiring Guidance?
The primary reference documents for the APX 6500 are the APX 6500 Mobile Radio Installation Guide and the APX 6500 User Guide. The Motorola APX CPS User Guide covers programming interface connections and data pin usage. These three documents contain the definitive pinout diagrams and connector specifications.
Access points:
- Motorola Solutions Online (MSOL): Full service manual access requires a registered account. Authorized service centers have complete technical library access.
- Motorola Solutions Product Pages: Some installation guides are publicly available in the support section for each APX model.
- Motorola-Authorized Dealers: Provide current technical bulletins including revision notices when connector specifications change between production runs.
Fact-Check Summary
| Claim in This Article | Verification Status |
|---|---|
| APX 6500 uses a 16-pin accessory connector | Verify against APX 6500 Installation Guide — [HUMAN REVIEW NEEDED] |
| Alternator whine increases with RPM (grounding fault indicator) | Verified — standard vehicle electrical diagnostic principle |
| Shield grounded at one end only prevents ground loops | Verified — standard shielded cable installation practice |
| Failed data handshake shows no error message | Verify against Motorola accessory behavior documentation — [HUMAN REVIEW NEEDED] |
| Portable APX accessories are not plug-compatible with APX 6500 | Verify connector format differences against current Motorola documentation — [HUMAN REVIEW NEEDED] |
Using manufacturer documentation over third-party guides matters because Motorola updates specifications when connector assignments change between production runs. A third-party guide from a prior revision may reference pin assignments that no longer apply to current hardware.
Frequently Asked Questions About Motorola APX Accessory Connector Pinout
Where Can I Find The Motorola APX Accessory Connector Pinout For My Radio?
The most reliable source is the Motorola APX 6500 Mobile Radio Installation Guide for your specific model. Access it through Motorola Solutions Online with a registered account, through a Motorola-authorized dealer, or on the Motorola Solutions product support page for the APX 6500. Always verify the document revision date against your radio’s production date — specifications can differ between production runs of the same model.
What Are The Most Common APX 6500 Accessory Connector Wiring Mistakes To Avoid?
Reversing audio polarity on the speaker output pins and exceeding the current rating of the accessory power pins are the two most damaging errors. A third critical mistake is using documentation from a different APX model, which may carry different pin assignments for the same physical pin positions. Use only APX 6500-specific documentation for every installation decision.